TABLE OF CONTENTS
WHAT TO UPGRADE IN CELESTION DITTON 66
First and most important step is re-capping. Celestion Ditton 66 crossover was made from components that were available in the 70s, which which usually means poor quality electrolytic capacitors (with an exception of the tweeter section). What makes matters even worse, is the fact that these caps are way out of specs – some even 20% out. Good news is that you don’t have to use over-the-top high end capacitors for this upgrade to give you good results. Good quality film caps that are within the specs will do the job. Changing internal wiring and upgrading speaker terminals is a nice thing to do too, but it is hard to say if it provides any audible improvements. It will definitely not make the things worse. Because the Celestion Ditton 66 I bought belonged to a HiFi shop and were used for many years as their reference speakers, they had tatty enclosures and handle marks on the sides (more of their story can be found in My Story paragraph in their review). Consequently, description of my upgrade below will not only cover Celestion Ditton 66 crossover upgrade, but it will also touch on refurbishing enclosures.
CELESTION 66 CROSSOVER UPGRADE PROCESS
Due to original Celestion Ditton 66 crossover caps being way out of spec, I decided to replace them first. A lot of positive feedback from people replacing original capacitors with Solen film capacitors can be found on the Internet, thus I decided to use these Solen caps too. Perhaps not the top of the range capacitors but way better than electrolytic ones, and within 5% tolerance too. All caps were placed on felt pads to damp vibrations. QED Silver Anniversary cables were used to do connections on the crossovers and to replace old speaker wires. Gold plated speaker terminals were used to replace standard terminals. All joints were made with WBT Silver Solder.
Initially I only re-capped one crossover, to check if I was able to hear the difference. I plugged both speakers in the mono mode (so each was playing same signal) and switched between them. The upgrade made a lot more difference than expected. In short, the speaker with upgraded crossover sounded a lot cleaner, more detailed and more engaging. I was very surprised as I did not expect the improvements to be so significant. I even swapped the crossovers between the speakers to ensure that the difference is a result of the crossover upgrade. Again, same effect – much improved sound. At this stage I rushed to the my workshop to upgrade the second crossover.


CELESTION DITTON 66 CABINET REFURBISHMENT PROCESS
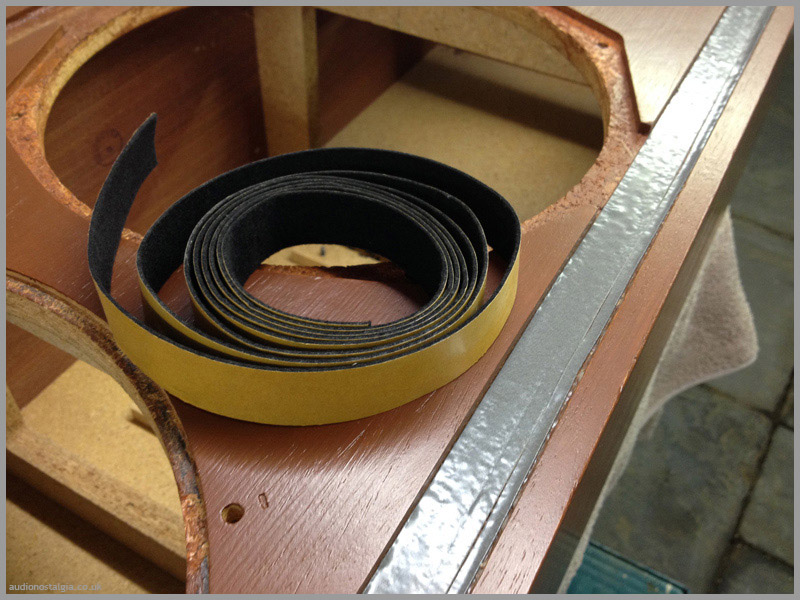
Having upgraded both Celestion Ditton 66 crossovers and all wiring, meant that I was able to look at the cabinets. Heavily batted chipboard did not look too promising, but I was not in a position to build new enclosures at the time, so I decided to refurbish the ones I had. The veneer was badly damaged in many places and some of the corners were chipped. Mixture of sanding powder and cellulose gel was used to fill in the gaps and rebuilt corners. Old varnish was sanded off. Due to imperfections in the veneer, two coats of wood dye were used, topped with multiple layers of dyed varnish. The original foam strips on the front panel were replaced with 1mm felt strips, which will not deteriorate over time. Four spikes were installed at the bottom of each speaker to provide better isolation. All metal fixtures used on the outside to hold speaker drivers in place, were cleaned and painted black. The original grills were not even considered as they are made of metal and not the best quality in general.


Due to necessity of using multiple layers of dyed varnish, my colour choice backfired a little. Let just say that only people with acquired taste will be able to appreciate the colour of these speakers ;). Despite the questionable colour choice, my Celestion Ditton 66 cabinets look much neater than before, and, although wood pattern is no longer visible, there is still a nice wood texture coming through the varnish.
LIST OF COMPONENTS & PRICES
Table below contains list of the parts together with prices, necessary to do the upgrade described above. The prices were correct at the time of publishing this article.
| Total Time: | 26h |
| Total Cost: | £185.72 |
| Capacitors | Original Value | Rep. Value | Qty | Price Per Unit | Total Price |
| Solen 400V | 72μF | 70μF 2μF |
4 | £15.89 £1.85 |
£63.56 £7.40 |
| Solen 400V | 4μF | 4μF | 2 | £2.34 | £4.68 |
| Solen 400V | 6μF 24μF |
30μF | 2 | £8.40 | £16.80 |
| Solen 400V | 1.5μF 1.5μF 1uF |
4μF | 2 | £2.34 | £4.68 |
| Solen 400V | 1.5μF 1.5μF 1.5μF 1.5μF |
6μF | 2 | £2.78 | £5.56 |
| £102.68 |
| Miscellaneous | Item Details | Unit | Qty | Price Per Unit | Total Price |
| QED Silver Anniversary | SP OFC | 1m | 3 | £7.00 | £21.00 |
| Speaker Binding Posts | Gold Plated | Piece | 4 | £2.50 | £10.00 |
| Speaker Spikes | M8 | Pack | 1 | £8.45 | £8.45 |
| Anti Squeak Tape | 4000x25x1mm | 1m | 4 | £1.75 | £7.00 |
| Cellulose Wood Filler | 175ml | Can | 1 | £5.95 | £5.95 |
| Liberon Dye (Teak) | 500ml | Can | 1 | £8.47 | £8.47 |
| Liberon Varnish (Matt) | 500ml | Can | 1 | £14.19 | £14.19 |
| Spray Paint (Black) | 500ml | Can | 1 | £7.98 | £7.98 |
| £83.04 |
Completed: September 2014 | Published: April 2015